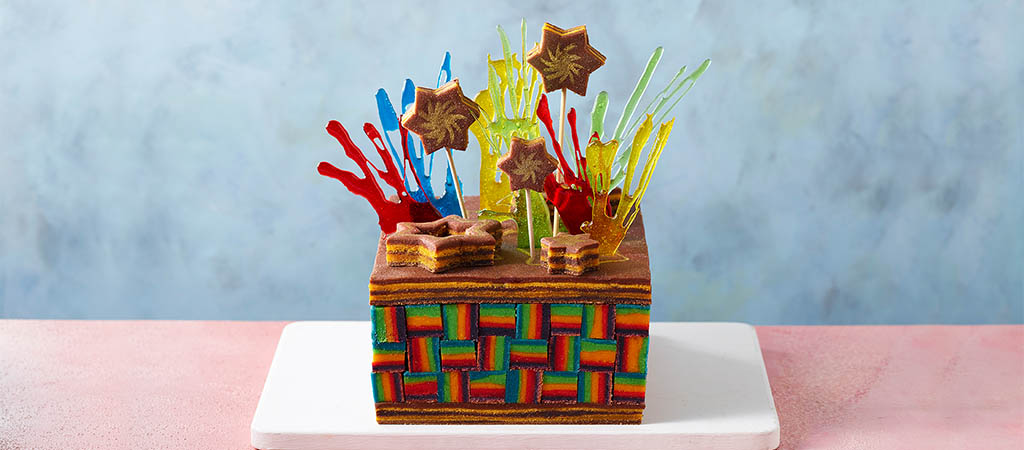
This Malaysian layered cake is great fun to make – but takes time to construct, so save it for when you have a free afternoon. It has a nifty technique for creating a rainbow cake that requires only two tins.

Alice
Series 10
Serves:
20
Difficulty:
Challenging
Hands-On Time:
2 hrs 30 mins
Baking Time:
1 hr 20 mins
- Ingredients
- Method
Print recipe
Method
Step 1
Beat the butter and sugar together in a stand mixer fitted with the beater, on medium speed until light and fluffy. Add the egg yolks one at a time, beating between each addition, until fully combined. Beat in the orange zest and juice, cinnamon and almond essence. Add the flour and beat for 30 seconds until just combined (don’t overmix). Transfer to another large bowl and wash out the stand mixer bowl.
Step 2
Whisk the egg whites in the clean bowl of the stand mixer fitted with the whisk, on medium speed until they reach soft peaks. Using a large metal spoon, stir 1 tablespoon of the egg whites into the bowl with the butter and sugar mixture, then fold in the remainder until evenly combined.
Step 3
Turn the oven onto the hottest grill setting and place the oven rack on the bottom shelf.
Step 4
Divide the mixture equally between 5 separate bowls (about 400g mixture in each bowl). Colour each portion with either pink, orange, green, blue or purple food colouring. Take one colour of mixture and divide it equally into the two lined tins. Using a spatula, spread it evenly in a thin layer. Place the tins one at a time in the bottom of the oven and grill for 4–5 minutes, or until lightly golden and firm to the touch. Cook the second tin of mixture in the same way.
Step 5
Next, spread half the second colour of mixture on top of the first cooked cake and grill as before. Repeat for the second cooked cake and the remaining half of the second colour. Continue until you have cooked all 5 layers one on top of the other. Leave to cool before turning out of the tin.
Step 6
For the chocolate and orange layer, beat the butter and sugar together in a stand mixer fitted with the beater until light and fluffy. Add the egg yolks one at a time, beating between each addition, until fully combined. Beat in the grated orange, orange juice, cinnamon and almond essence. Add the flour and beat for 30 seconds until just combined (don’t overmix). Transfer to another large mixing bowl and wash out the stand mixer bowl.
Step 7
Whisk the egg whites in the clean bowl of the stand mixer fitted with the whisk, on medium speed until they reach soft peaks. Using a large metal spoon, stir 1 tablespoon of the egg whites into the bowl with the butter and sugar mixture, then fold in the remainder until evenly combined.
Step 8
Divide the mixture in half into 2 separate bowls. Add the cocoa to one bowl and orange food colouring to the other. Spoon one quarter of the cocoa mixture into one of the tins and a quarter into the other tin, then grill one at a time for about 5 minutes each, or until the sponge is firm to the touch. Spoon one quarter of the orange mixture on top of each of the chocolate sponge layers and grill again. Repeat the whole process to give 4 (2 chocolate, 2 orange) alternating layers in each tin.
Step 9
For the salted caramel sauce, heat the sugar and 120ml of water in a medium pan over a low heat, without stirring, until the sugar has dissolved. Increase the heat and bring to the boil. Boil for about 5 minutes, shaking the pan occasionally but not stirring, until it turns a deep caramel colour. Remove from the heat and quickly stir in the cream, butter, vanilla and salt. Pour into a bowl and allow to cool.
Step 10
For the marzipan, sift the icing sugar and caster sugar into a large heatproof bowl, then stir in the egg. Place the bowl over a pan of gently simmering water and, using a hand-held electric whisk, whisk for about 10 minutes, until thick and fluffy. Remove from the heat and stir in the almond essence, orange juice, ground almonds and cocoa powder. Knead to a smooth paste. Wrap in cling film until you’re ready to assemble.
Step 11
To assemble, roll out the marzipan on a worksurface lightly dusted with icing sugar until about 3–4mm thick, and it cut into 2 pieces large enough to cover each chocolate and orange sponge (you may need to re-roll the marzipan trimmings for the second piece).
Step 12
Spread each chocolate and orange sponge with a little caramel and place a marzipan layer neatly on top of each, smoothing out any bumps. Cut each marzipan-covered chocolate and orange sponge into a 20cm square, reserving the cuttings. Place one square on a serving plate and spread with some more caramel. Using the ruler, cut the rainbow cakes widthways into 2cm-wide strips.
Step 13
Add one strip of rainbow cake onto the coated square cake so that the coloured layers are vertical, add the next strip of cake next to it so that the coloured layers are horizontal. Continue working across the square cake, using the rainbow strips to form a full layer, ‘gluing’ each strip to the next with a little caramel (you should need about 8 strips to create the layer). Start the next layer with a horizontal strip, then a vertical, and continue until all the strips are stacked 3 layers high to make a deep, square cake. Spread the top with a little caramel and place the second square, marzipan-covered chocolate and orange sponge on top. Brush thinly with caramel.
Step 14
Using the cutters, cut out two 9cm stars and two 7cm stars from the reserved cuttings of chocolate and orange sponge. Use the 5cm cutter to cut out the centres of the 9cm stars (also giving two 5cm stars). Place the hollowed-out larger stars and one of the 5cm stars on the top of the cake, attaching with the remaining caramel.
Step 15
Mix the gold glitter with a tiny drop of alcohol and, using the paintbrush, paint swirly star shapes on top of the cake and the remaining stars. Insert the wooden skewers half way into the sides of the decorated star shapes and then insert the other ends of the skewers into the cake, so that the stars stand up at various heights.
Step 16
To make the isomalt decorations, one by one, melt each colour of isomalt in the microwave in 30-second bursts until the isomalt becomes fluid. Using heatproof gloves, take the colour out of the microwave, stir with a metal spoon and wait for the bubbling to stop, then slowly drizzle over the lined baking tray in any shape you like. Leave to set until cold (see warning, below), then position on top of the cake before serving.
Warning
Take extreme care when using isomalt as it gets extremely hot and will burn your skin. Always wear gloves and do not be tempted to touch it until cold.