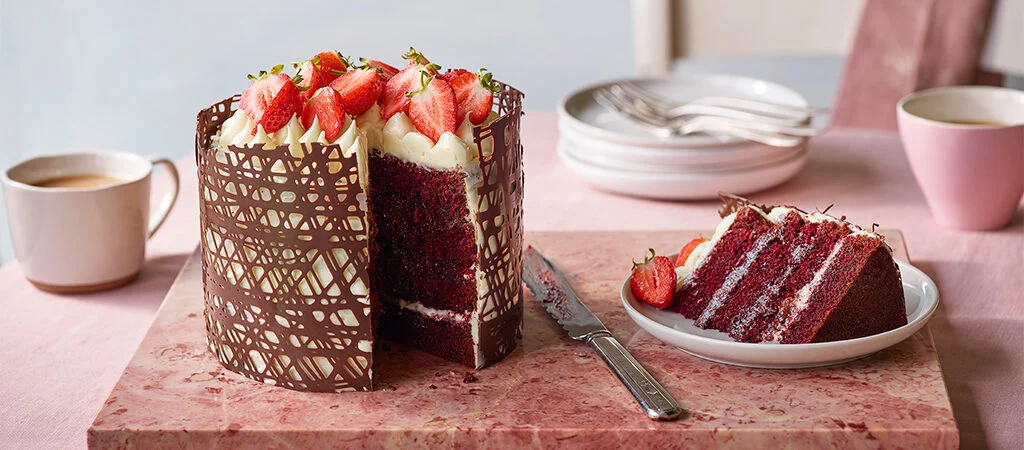
As if red velvet cake wasn’t impressive enough with its vividly coloured sponge, this version is also gluten-free. It is sandwiched with sweet strawberry jam and both vanilla and chocolate cream-cheese frosting and wrapped in a delicate tempered chocolate collar for an utterly professional finish.

Chigs
Series 12
Serves:
12
Difficulty:
Needs skill
Hands-On Time:
1 hr 30 mins
Baking Time:
40 mins
- GF
- Ingredients
- Method
Print recipe
Method
Step 1
Heat the oven to 180°C/160°C fan/350°F/Gas 4.
Step 2
Make the red velvet sponge. Beat the butter and both sugars in a stand mixer fitted with the beater, on medium speed for 3–5 minutes, until pale and creamy.
Step 3
With the mixer still running, one at a time add the eggs, beating well between each addition.
Step 4
In a jug, whisk together the buttermilk, oil and red food-colouring paste.
Step 5
Sift the flour, xanthan gum and cocoa powder together into a large mixing bowl.
Step 6
Remove the bowl of butter and sugar mixture from the stand mixer and, using a large spoon or spatula, fold in one third of the dry ingredients, the stir in half the buttermilk mixture. Repeat until all of the dry and wet ingredients are incorporated into the butter and sugar mixture.
Step 7
In a small bowl, mix together the bicarbonate of soda and apple cider vinegar to make a slurry. Add this to the cake mixture and quickly beat to incorporate.
Step 8
Divide the mixture equally between the two prepared tins and level the tops. Bake for 35–40 minutes, until the sponges are risen and a skewer inserted into the centre of each comes out clean. Leave the sponges to cool in the tins for 10 minutes, then turn them out onto a wire rack. Gently, turn the sponges the right way up and then leave them to cool completely.
Step 9
Meanwhile, make the strawberry jam. Put the strawberries in a small saucepan. Add the jam sugar and lemon juice and place the pan over a low heat. Slowly bring the liquid to the boil and, once the sugar has melted, increase the heat and boil for a further 5–10 minutes, until the temperature on the sugar thermometer reaches 105°C (alternatively, test a teaspoon of jam on a saucer that has been kept in the freezer for 20 minutes –if it wrinkles when you press it, the jam is ready). Remove the jam from the heat transfer it to a clean bowl and leave it to cool and set.
Step 10
Make the cream-cheese frosting. Beat the butter and icing sugar together in a stand mixer fitted with the beater, on medium speed for 3–5 minutes, until pale and creamy. Add the vanilla and beat again.
Step 11
Add the cream cheese and beat to incorporate, being careful not to over-mix.
Step 12
Spoon one quarter of the frosting into a small bowl and fold in the cocoa powder. Transfer the chocolate frosting to a piping bag fitted with a round nozzle. Transfer the remaining vanilla frosting into the remaining piping bag fitted with a round nozzle.
Step 13
Using a long, serrated bread knife, cut each sponge in half horizontally to make four thinner sponges. Place one sponge on the cake board or plate and pipe vanilla frosting on top, spreading it evenly to the edges. Pipe a ring of the vanilla frosting around the edge of the sponge and fill in the middle with some of the strawberry jam. Place a second sponge on top and repeat, this time with the chocolate frosting and strawberry jam. Place a third sponge on top, and repeat with the chocolate frosting and strawberry jam.
Step 14
Add the final sponge and pipe a generous layer of vanilla frosting on top. Smooth it out with a large offset palette knife.
Step 15
Pipe thick stripes of vanilla frosting around the side of the cake and smooth the edges with a palette knife or cake scraper to create a perfect finish. Refrigerate for 30 minutes to firm up.
Step 16
Meanwhile, make the chocolate collar. Melt 75g of the dark chocolate in a heatproof bowl set over a pan of barely simmering water, then heat it until it reaches 41°C on the cooking thermometer. Remove the bowl from the pan and stir in the remaining 25g of chocolate, until the chocolate has melted and cooled to 32°C.
Step 17
Place the two strips of acetate or baking paper on the worktop. Using a small spoon, thickly splatter melted chocolate onto both acetates to create a sort of criss-cross weave effect. Leave to set until firm but pliable (about 15 minutes).
Step 18
Remove the cake from the fridge and wrap one of the collars around the cake, pressing firmly against the side of the cake to secure it in place and peeling away the acetate as you go. Starting where the first collar finishes, to create a continuous effect, wrap the second collar around the second half of the cake. Discard the acetates.
Step 19
Use the remaining vanilla frosting in the piping bag to dot blobs all over the top of the cake, then top with the halved strawberries. Trim the collar as necessary so that it stands at roughly the same height as the strawberries, to finish. Serve immediately.