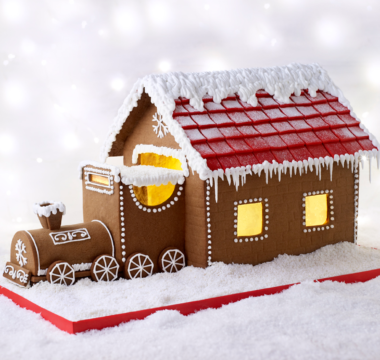
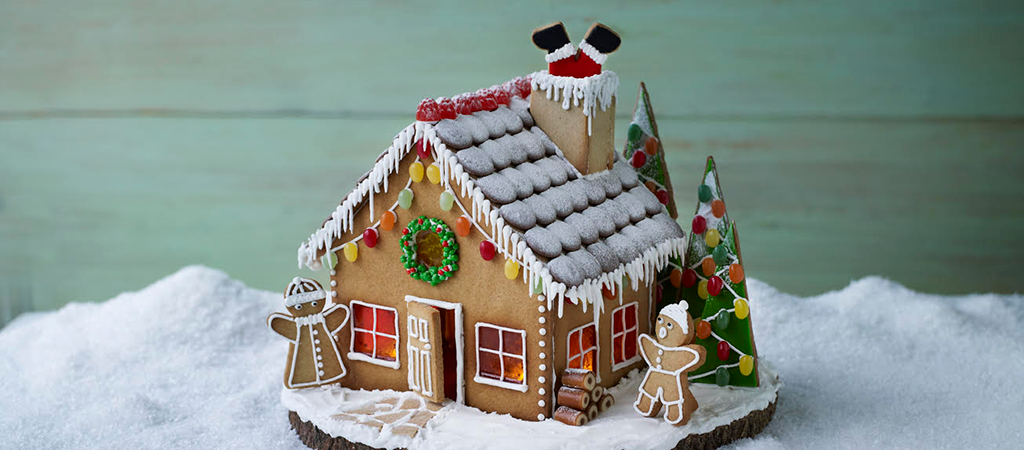
This beautiful, festive gingerbread house is the perfect way to get the whole family involved in baking for Christmas.
Serves:
20
Difficulty:
Needs skill
Hands-On Time:
about 3 hrs
Baking Time:
30 mins
- Ingredients
- Method
Print recipe
Method
Step 1
Download and print the Gingerbread House templates (PDF, 107kb). You will need more than one of some parts, as indicated in the template references.
Step 2
Make the gingerbread. Heat the sugar, golden syrup and orange juice in a large pan over a low heat, until all the sugar crystals have melted (about 5 minutes). Remove from the heat and stir in the butter until melted. Sift the flour, ginger and salt into the wet ingredients, then stir to combine. Bring the mixture together with your hands and knead it to a dough.
Step 3
Divide the warm dough into 3 equal pieces. Roll out each piece between 2 sheets of cling film until 5mm thick. Slide the cling-filmed gingerbread sheets onto the baking sheets and refrigerate for 30 minutes until firm.
Step 4
Once the gingerbread has cooled, transfer the pieces to a lightly floured work surface and cut out the gingerbread pieces using the templates, re-rolling the trimmings as necessary. Line the baking sheets with baking paper and carefully transfer the cut pieces of gingerbread onto them. Keep all the small pieces together on one tray.
Step 5
Cut 2 small holes along a long edge of each roof piece – make sure the holes line up when you place the edges side by side (you’ll thread string through them to secure the roof pieces together). Cut 2 square windows into the front and each of the side sections. Slice 2 cut-out windows in half diagonally to make 4 triangles. Slice one in half again to make 2 smaller triangles. Three of the large triangles will support the trees and the 2 smaller ones will support the gingerbread men. (The remaining cut-out windows will make the path.) Cut out the door from the front section, between the 2 windows, reserving the door piece. Cut out or use the 3cm round cutter to stamp out a circle in the front and back sections (discard the cut-out circles). You should end up with: 1 x front, 1 x back, 2 x side walls, 2 x roof sections, 1 x door, 4 x chimney sections, 1 x Santa’s legs, 3 x trees, 2 x gingerbread men or women, 3 large triangular supports, 2 small triangular supports, and 4 x spare window pieces to make the path.
Step 6
Chill the gingerbread pieces for 1 hour (this will prevent them spreading during baking).
Step 7
Meanwhile make the strong royal icing. Beat the powdered egg white with the water and lemon juice in a stand mixer fitted with the paddle attachment until frothy. Gradually add the sifted icing sugar on a low speed until combined (use a damp tea towel around the bowl to prevent puffs of icing, if you like). Beat the icing for 5 minutes on high speed until very stiff.
Step 8
Spoon one quarter of the icing into the small piping bag fitted with the writing nozzle. Spoon another quarter into the disposable piping bag. Cover the remaining icing with a damp tea towel until needed. Heat the oven to 180°C/160°C fan/350°F/Gas 4.
Step 9
Bake the small pieces of gingerbread for 10 minutes, or until golden brown and firm. Slide onto a wire rack to cool.
Step 10
Bake the large gingerbread pieces for 15 minutes, then pop 2–3 red boiled sweets into each square window pane and 1 yellow boiled sweet into each round window and return to the oven. Bake for a further 3–5 minutes, or until the gingerbread is firm and golden and the sweets have melted and filled the panes, but are not bubbling. Remove from the oven and leave on the baking sheets until cold. If the gingerbread has spread during baking, either trim around the pieces with a sharp knife while still hot or allow to cool completely, then gently shave the uneven edges with a fine grater.
Step 11
To add the details to the walls, door, windows and gingerbread people, pipe icing lines and dots using the icing bag fitted with the writing nozzle (follow the photograph as a guide). Stick on sweets with icing to create fairy lights hanging from the roof. Pipe three rings of icing around the round windows and press small green and red sprinkles on top to create two wreaths.
Step 12
To assemble, snip a 5mm hole in the tip of the disposable piping bag and pipe 2 fat lines of icing along the base of the front of the house and press it upright onto the cake board. Prop it up with two mugs. Pipe icing along the base and ends of the side walls and stick these to the front of the house and cake board. Support with mugs. If you’re using them, bundle up the fairy lights in the centre of the house. Trail the lead and switch over the back of the board. Pipe icing along the base of the back of the house and stick this to the side walls and on top of the fairy-light lead. Leave everything to set for 15 minutes, then remove the mugs.
Step 13
To assemble the roof, pipe generous lines of icing along the front and back of the gable ends of the house. Loosely tie the roof pieces together with string using the cut-out holes, then position the roof on the house so the ends overlap the front and back equally. Tighten the strings and re-tie so they hold the roof in place. Leave the roof pieces to set completely before you remove the strings. Stick the chimney sections together with icing and stick the chimney to the roof.
Step 14
To decorate the roof, pipe fat blobs of icing onto the back of the chocolate buttons and stick them on, starting along the bottom of the roof edge and working upwards row by row, overlapping each row slightly, like tiles. Cut the buttons to fit around the chimney, if necessary. Use icing to stick sweets along the roof ridge.
Step 15
For the trees and Santa’s legs, colour 100g of the marzipan or fondant green, then colour half of the remaining marzipan or fondant red and the other half black. Roll out each coloured marzipan thinly on a surface dusted with icing sugar. Lightly brush the trees and Santa with water, then cut the marzipan or fondant in the appropriate colours to cover the trees, Santa’s boots and the rest of Santa’s legs. Use a little of the black marzipan or fondant to roll into tiny balls to use as the pupils of the gingerbread people’s eyes – stick these in place. Pipe white zigzags on the trees, dust the tree tops with sifted icing sugar, then stick on jelly sweets with blobs of white icing to form baubles.
Step 16
Spread the remaining portion of icing (in the bowl) over the cake board around the house, including covering the fairy-light lead, if using. Snap the whole cut-out windows into small pieces and press these into the iced board to create a crazy-paved path.
Step 17
Stick the door into the doorway. Pipe short lines of icing up the backs of the trees and on the backs of the gingerbread people. Position the trees and gingerbread people on the cake board, wedging them upright with the reserved triangular gingerbread supports.
Step 18
Pop the Santa upside-down in the chimney. Using the remaining icing in the piping bag fitted with the writing nozzle, pipe snowy icicles along the edges of the roof and chimney pot. Stack the pieces of caramel cable sweets to create a log pile. Lightly dust the trees and roof with sifted icing sugar, then switch on the lights to complete the masterpiece!