This recipe assumes that you don’t have two large bundt or kugelhopf tins, so you will need to make the cake mixture up twice. If you do have two tins, simply double the mixture and make one batch. If you don’t have time to roast your own butternut squash to make the purée, use cans of pumpkin purée instead.

Helena
Series 10
Serves:
12
Difficulty:
Needs skill
Hands-On Time:
2 hrs 30 mins
Baking Time:
35 - 40 mins
- Ingredients
- Method
Print recipe
Method
Step 1
Heat the oven to 180°C/160°C fan/350°F/Gas 4. Place the squash halves in a roasting tin, cut sides uppermost, cover them loosely with foil, and bake for 35–40 minutes, or until tender. Leave the oven on. Scoop out the flesh (avoiding the stringy bits and seeds) and transfer it to a food processor. Blitz until smooth and set aside.
Step 2
Make the sponge. In a large bowl sift together the flour, baking powder, salt, cinnamon, ginger, nutmeg and cloves.
Step 3
In another bowl combine the eggs, oil, both sugars and vanilla, along with half (about 425g) of the pumpkin purée (keep the remainder for the second sponge). Whisk with a balloon whisk until fully combined. Add the dry ingredients and whisk until smooth.
Step 4
Pour the batter into the prepared tin and bake for 35–40 minutes, or until a skewer inserted in the centre comes out clean. Leave to cool in the tin for about 4 minutes, then turn out onto a wire rack and leave to cool completely.
Step 5
Wash and grease the tin and make the second sponge.
Step 6
While the cakes are cooling, prepare the buttercream. Whisk the egg whites and sugar in a medium heatproof bowl until frothy. Place the bowl over a pan of simmering water and whisk for about 5 minutes, until smooth and it reaches 71°C/160°F on the sugar thermometer.
Step 7
Scoop the mixture into the bowl of a stand mixer fitted with the whisk attachment and mix until the temperature drops to room temperature – the bottom of the bowl will feel cool to the touch (about 5–10 minutes).
Step 8
Switch to the beater attachment and start adding the butter, a heaped tablespoon at a time, mixing well between each addition. Add the maple syrup and continue mixing until smooth, then set aside.
Step 9
Using a serrated knife, level the flat sides of each sponge. Spread buttercream over one levelled side, then sandwich together with the second sponge. If necessary (if your tins don’t have ridges), carve out the ridges of the pumpkin. Use some of the buttercream to give the whole cake a crumb coat, then refrigerate it for 10 minutes, before giving it a second coat of buttercream.
Step 10
Begin the decoration. Lightly dust the work surface with icing sugar and roll out the brown fondant into a disc about 3mm thick and about 50cm in diameter. Carefully lift up the fondant and cover the cake, trimming off any excess. Using your hands, smooth out the fondant making sure you go into the ridges of the pumpkin to give it shape (a long skewer can help with this). Re-roll the fondant cut-offs and use a sharp knife or leaf-shaped cutter to cut these out into leaf shapes.
Step 11
Spray the pumpkin and the leaf shapes in bronze edible spray.
Step 12
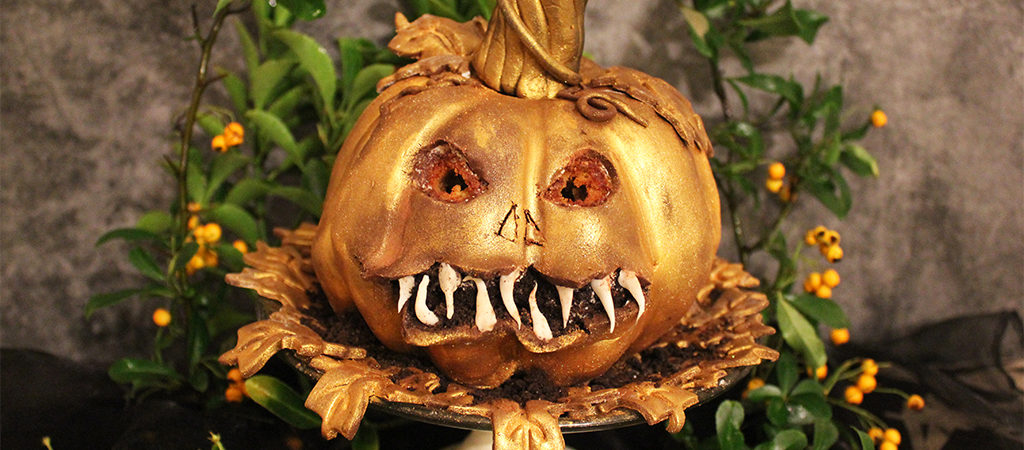
Using your sharp knife, carve out the eyes, nose and mouth, using the photograph as a guide. Press some of the crushed Oreo biscuits into the mouth and eyes (or, you can insert battery-operated lights into the eyes if you like, but don’t forget to take them out before eating).
Step 13
Using the white fondant, shape some teeth and use a drop of water to stick these to the mouth.
Step 14
Make the stalk. Shape the modelling chocolate into a cone shape and twist it to form a stalk. Push a wooden skewer into the base of the stalk, leaving the end of the skewer sticking out, and leave it to dry for an hour or so. Then, spray the stalk with bronze spray.
Step 15
To serve, scatter a serving plate with more crushed Oreos and position the pumpkin on top. Push the exposed end of the wooden skewer into the top of the cake to fix the stalk in place and arrange the leaves around it.