
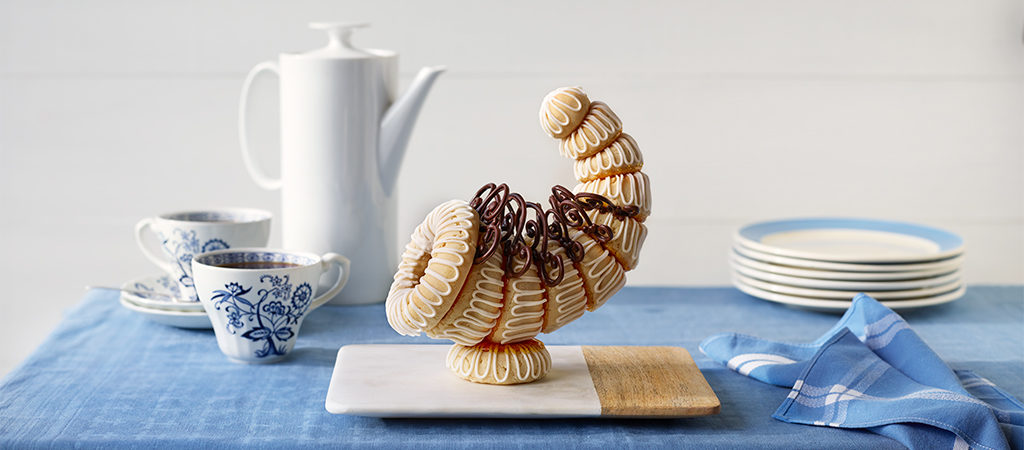
This is a traditional Scandinavian horn of plenty, made from a dough of eggs, almonds and sugar, and held together with caramel. You’ll need to use the templates provided to make sure your rings fit perfectly together.
Makes:
10
Difficulty:
Challenging
Hands-On Time:
2 hrs, plus chilling
Baking Time:
12 mins
- Ingredients
- Method
Print recipe
Method
Step 1
Download and print the Weight & Shape Template.
Step 2
To make the dough, tip the ground almonds and icing sugar into a bowl, add the egg whites and the almond extract and mix to a dough with your hands. Cover the bowl with cling film and chill for at least 2 hours, preferably overnight; or freeze for 30 minutes.
Step 3
Heat the oven to 190°C/170°C fan/375°F/Gas 5. Using the Weight & Shape Template measure out a 14g piece of dough and roll it into a smooth ball, then place it on the lined baking sheet.
Step 4
To shape the rings that form the horn, measure out 18g of dough and shape it into a cigar shape with slightly tapered ends as per the template shape number 1. Place the cigar on a piece of baking paper placed over the template and press lightly on one side so that the cigar is slightly triangular when stood up. Make sure not to stretch the length of the cigar, as it must be the length on the template in order for all the rings to fit together. Press the ends together overlapping by 5mm to form a ring, and place on the baking sheet next to the ball.
Step 5
Continue weighing and shaping rings numbers 2, 3, 4, 5, 6, 7 and 8 in exactly the same way as step 3, by weighing and moulding the correct weight and length according to the template. Place the rings on the baking sheet in size order for easy assembly.
Step 6
For ring number 9, which forms the rim of the horn, weigh out 84g of dough and shape it completely flat (not triangular) as per template number 9. Press the ends together overlapping by 5mm and place the ring on the baking sheet.
Step 7
For the stand (on which the horn sits), weigh out 50g of dough and shape it flat as per the template. Press the ends together overlapping by 5mm and place on the baking sheet.
Step 8
Place a piece of baking paper on top of the rings. Place an empty baking sheet on top of the baking paper and press gently to flatten the tops of the rings. Remove the baking sheet and paper and bake the rings for 10–12 minutes, until lightly brown. Leave the rings to cool completely, then place them in the freezer (this will help the caramel to set faster when you come to stick the horn together).
Step 9
Temper the chocolate for decoration. Melt 225g of the chocolate in a bowl set over a pan of gently simmering water, until it reaches 44°C/111°F on the thermometer. Remove the bowl from the heat and add the remaining 75g of chocolate, stirring until the chocolate has melted and cooled to 32°C/90°F. Spoon the chocolate into the heat-resistant piping bag fitted with the writing nozzle.
Step 10
Place a sheet of acetate over the Chocolate Decorations Template and pipe chocolate scrolls over the top. You will need 6 large chocolate scrolls and 7 small chocolate scrolls, but pipe extra as they break easily. Leave to cool, then peel off the acetate. Place the decorations smooth side (the side that was on the acetate) facing upwards and pipe chocolate over the smooth side of the scrolls so they are thicker and so that they are shiny on both sides. Leave to set.
Step 11
For the icing, whisk the egg white in a large bowl until frothy. Gradually whisk in the icing sugar a spoonful at a time, until the mixture forms stiff, glossy peaks when you remove the whisk. Spoon the icing into the piping bag fitted with number 2 writing nozzle.
Step 12
Pipe looped or zig-zag patterns of white icing onto the cooled rings and leave to set.
Step 13
Make the caramel. Heat the sugar with 2 tablespoons of water in a heavy-based saucepan over a low heat, gently swirling the pan from time to time (but don’t stir), until the sugar dissolves. Increase the heat, bring the syrup to the boil and continue to cook, without stirring, until it turns an amber colour, then quickly slide the pan off the heat.
Step 14
To assemble, place the rim (number 9) upside down on a clean tea towel. Very carefully dip the base of ring number 8 into the caramel and place it on top of rim 9 to join them base to base.
Step 15
Dip the bottom of ring number 7 in the caramel and place it neatly on top of ring number 8. Repeat the process ring by ring, while gently supporting the horn as you add each ring. Finally, place the ball on the top and leave the cornucopia to set until firm enough to stand on its own.
Step 16
Dip the top of the stand in the caramel and balance the horn on top. Leave to set.
Step 17
Using the remaining melted chocolate, stick the large chocolate scrolls on top of the joins between 6&7, 7&8 and 8&9, then stick the smaller scrolls on top of the joins between 3&4, 4&5 and 5&6. Finally stick one small scroll in the centre of the rim (number 9).