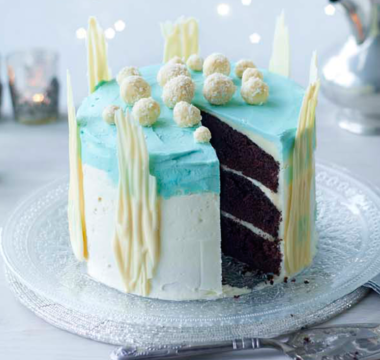
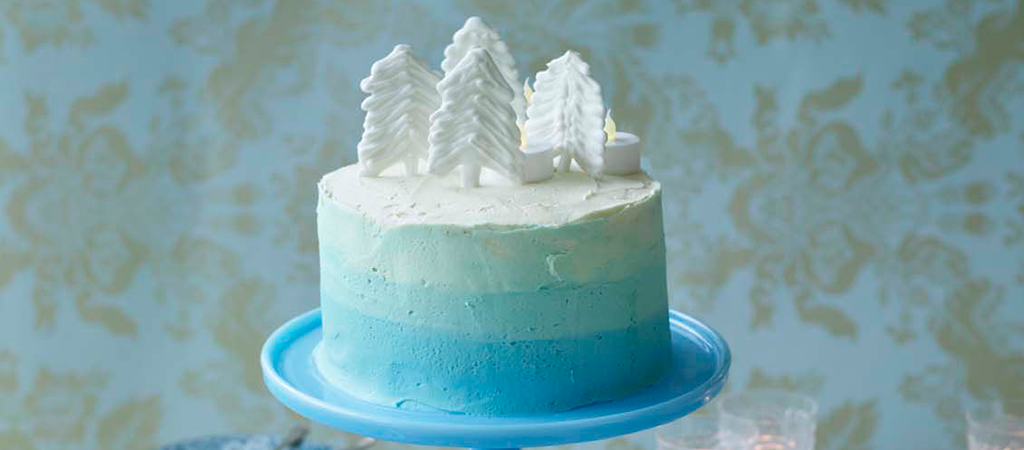
A tall, three-layered sponge, sandwiched with passion-fruit buttercream and covered in blue-tinged vanilla buttercream.

Rav
Christmas & New Year Specials
Serves:
12-16
Difficulty:
Easy
Hands-On Time:
2 hrs
Baking Time:
25 mins
- Ingredients
- Method
Print recipe
Method
Step 1
To make the sponges, heat the oven to 180°C/160°C fan/350°F/Gas 4. Sift the flour, baking powder and ground almonds into the bowl of the stand mixer (press through any small pieces of almond left in the sieve). Add the sugar, butter, beaten eggs and almond extract, then (using the whisk or paddle attachment) mix on a medium–slow speed until fully combined.
Step 2
Divide the mixture equally between the three prepared tins and spread evenly. Bake in the oven for about 20–25 minutes – until each sponge is golden brown, starting to shrink from the sides of the tin, and springs back when gently pressed in the centre. Run a round-bladed knife around the inside of each tin to loosen the sponge, leave to firm up for 3 minutes then carefully turn out onto a wire rack and leave to cool completely.
Step 3
When the sponges are cool, make the passion-fruit buttercream: put the butter into the bowl of the (clean) stand mixer and whisk for 2–3 minutes until very light and fluffy. Gradually whisk in the icing sugar, using a slow speed to avoid making a mess. Once the icing sugar has been fully incorporated, whisk on a high speed until the mixture is very fluffy and smooth.
Step 4
Slice each passion fruit in half and scoop out the seeds and pulp into a sieve placed over a jug. Stir and press down on the seeds to push through as much juice as possible then slowly whisk the juice into the buttercream. Remove 300g and set aside for the crumb coating.
Step 5
To assemble the cake: place one sponge top-side down on a cake board or serving platter. Spread with half the remaining buttercream. Top with a second sponge (top-side down) and spread with the other half of the remaining buttercream, then cover with the final sponge (top-side up). Press lightly so the sponges make a firm cake with completely straight sides (no tilting). Using an offset spatula, cover the top and sides of the cake with a very thin layer of buttercream using the 300g portion set aside – this will be the crumb-catcher coating and will give the finished cake a professional touch. Chill until firm.
Step 6
Meanwhile, make the vanilla buttercream in the same way – but flavouring it with vanilla extract instead of passion fruit. Divide the mixture into 4 and place each portion in a separate bowl. Cover one bowl – this is the plain white topping for the cake. Colour the second bowl a dark shade of blue using the blue food colouring (use the end of a cocktail stick to add a few drops to the buttercream). Colour the third bowl a lighter shade of blue, and the final bowl an even lighter hue.
Step 7
Using an offset palette knife, spread the darkest blue buttercream around the bottom third of the cake. Spread the next lightest shade around the middle third, and the palest shade around the upper third. Clean the palette knife and spread the white buttercream over the top of the cake (you can add a few bumpy ‘snowdrifts’ if you like, or make it very smooth like an ice rink). Slightly ease the white buttercream over the edge of the cake so it creeps down the sides a little. Then, using the palette knife or cake smoother, carefully blend and smooth the shades so there is a gradual shading from dark to light, from bottom to top. Leave somewhere cool (not the fridge if possible) to firm up.
Step 8
To make the tree decorations: draw 10 Christmas trees (about 7cm tall) on a large sheet of baking paper – either free hand or by drawing around a shaped cookie cutter. You will need about 8 trees but make a couple of extras in case of accidents. Flip the paper so the marks are on the underside. Place a cocktail stick vertically down the centre of each tree, where the trunk would be, making sure there’s 2cm of stick below the base of each tree (so you can stick it into the icing).
Step 9
Mix the royal icing sugar with just enough of the water to make a very stiff but pipeable paste, then transfer it to the piping bag. Snip off the end to make a thick writing tip, then, starting at the top of each tree, pipe the icing back and forth across the stick in a zigzag motion to fill the template. Leave for several hours (or even overnight) until hard before carefully peeling away the paper.
Step 10
When ready to serve, decorate the top of the cake with the icing trees and add the LED tea lights and edible glitter, if using.