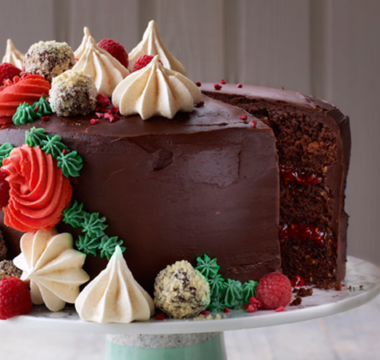
This humdinger of a vegan celebration cake requires a bit of skill, but is sure to impress. Aquafaba is the drained water from a can of chickpeas.

Kim-Joy
Series 9
Serves:
30
Difficulty:
Challenging
Hands-On Time:
4 hrs
Baking Time:
40 mins
- VG
- Ingredients
- Method
Print recipe
Method
Step 1
Heat the oven to 180°C/160°C fan/350°F/Gas 4. Make the sponge for the bottom tier. Mix all the dry ingredients together in a large bowl and whisk all the wet ingredients together in another large bowl. Add the dry ingredients into the wet, and whisk until smooth and just combined.
Step 2
Pour the mixture equally into the 3 larger tins and bake for 15–20 minutes, or until a skewer inserted in the centres comes out clean. Immediately invert the sponges onto a wire rack and peel off the baking paper. Leave to cool.
Step 3
Mix together the sponge ingredients for the smaller, top-tier cakes, as before, and bake for 15–20 minutes, until a skewer inserted into the centres comes out clean. Invert onto a wire rack and leave to cool.
Step 4
Meanwhile, make the lemon curd. Whisk together the cornflour and 100ml of water to a smooth paste. Place in a small pan and stir in the sugar and lemon juice.
Step 5
Cook on a medium heat, stirring occasionally, until all the sugar has dissolved, then keep stirring until the mixture has thickened and you can no longer taste the cornflour.
Step 6
Turn the heat down to low and add the soy milk and coconut oil. Stir briskly until the oil has melted and the mixture is smooth, then pour into the shallow metal tray, cover with cling film and freeze for about 45 minutes.
Step 7
Make the biscuits. Add all the dry ingredients and vanilla to a bowl, then rub in the coconut oil. Add 20–25ml of water and combine into a dough ball.
Step 8
Roll out the dough on a floured worktop to about 6mm thick. Cut out 3 mushroom shapes and 3 fox shapes. Place on a lined baking tray and bake for about 8–10 minutes, until slightly browned at the edges. Transfer to a wire rack to cool.
Step 9
Meanwhile, make the royal icing. Put 75ml of the aquafaba in the bowl of a stand mixer fitted with the paddle attachment. Mix on medium–high speed until frothy, then add half the icing sugar and mix on a medium–low speed until smooth.
Step 10
Add the remaining icing sugar and mix to combine and until thick enough that it takes 20–25 seconds to re-incorporate a ribbon of icing dropped from a spoon. Add more icing sugar if the mixture is too runny.
Step 11
Spoon about two thirds of the royal icing into a medium bowl, then divide this into 3 unequal portions – you’ll need slightly more of 1 portion than the other two.
Step 12
Colour the larger portion with orange colouring and a tiny amount of the honey-gold to make orange with a tinge of golden brown. Add the brown food colouring and cocoa powder to 1 of the smaller portions for a deep brown colour. Leave the remaining portion white.
Step 13
Divide the icing colours into piping bags as follows, and set aside:
• Orange: ¼ into 1 piping bag and ¾ into another.
• Brown: all into 1 piping bag.
• White: ¼ into 1 piping bag and ¾ into another.
Step 14
Add enough orange colouring to give a bright orange colour to the remaining icing in the mixer bowl, and stir in 1 tablespoon of aquafaba at a time, until the icing is runny enough for a controlled ‘drip’ on the side of a cake tin. Cover with cling film and set aside.
Step 15
Make the buttercream. Put the margarine into the clean bowl of a stand mixer fitted with the paddle attachment and mix on low–medium speed until smooth. Mix in the vegetable shortening until smooth and combined.
Step 16
Mix in one third of the icing sugar until combined, then add the remaining icing sugar, gradually increasing the speed each time, until the buttercream is white and smooth. Put half the buttercream into a large disposable piping bag. Divide and colour the remainder as follows, and set aside:
• About 150g buttercream coloured with pink food colouring.
• About 150g buttercream coloured dark green.
• About 2 tablespoons of buttercream coloured light green.
• Leave the remainder in the bowl.
Step 17
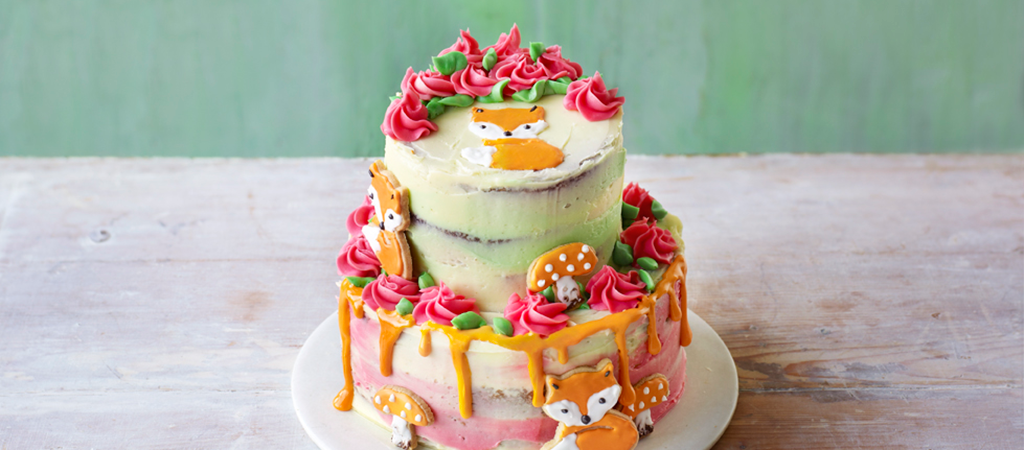
Assemble the base. Place the larger cake board on the icing turntable. Snip a large tip on the piping bag of white buttercream and pipe a blob on the cake board. Top with 1 large sponge.
Step 18
Spread a little buttercream from the bowl over the surface of the cake and, from the piping bag, pipe a white buttercream ‘dam’ around the top edge of the cake (this is to stop the lemon curd seeping out). Spoon 2–3 tablespoons of the lemon curd on top and spread evenly. Repeat with a second large sponge and then top with the third large sponge.
Step 19
Spread the white buttercream from the bowl on top of the cake and around the sides. Spread a few smears of pink buttercream here and there on the sides. Smooth the top, then smooth the sides using an icing scraper. Aim for just a thin crumb coat. Insert dowels into the cake and transfer to the fridge.
Step 20
Assemble the top tier. Place the smaller cake board on to the turntable and stack and ice the smaller sponge layers just as you did for the base tier, except this time using dark green icing on the top and a combination of white and dark green buttercream on the sides.
Step 21
Mark the outline of a fox shape on the top of the uppermost cake using the toothpick.
Step 22
Snip a very small hole in the piping bag containing the smaller amount of orange royal icing, and snip a small–medium tip on the bag containing the larger amount of orange royal icing. Repeat for the white royal icing. Snip a small tip on the brown royal icing.
Step 23
Use the small-tipped piping bags of orange and white royal icing to pipe the outline of the fox. Use the larger tipped bags to ‘flood’ the orange and white areas. Working quickly, use a toothpick to blend the white and orange by the tip of the tail. Leave to set, then add the legs, nose and mouth.
Step 24
Meanwhile, start piping the biscuits, piping the foxes in exactly the way you did for the cake. Pipe orange over the mushroom biscuits (outline first, then flooding), and pipe on white dots while the orange icing is still wet.
Step 25
Remove the first cake tier from the fridge and place the second tier on top. Using a large spoon, pour the thinned orange icing in carefully controlled drips down the side of the bottom cake tier.
Step 26
To make the roses and swirls, marble the pink buttercream with a little of the remaining white buttercream, but don’t over mix, then divide it in half and place each half in a large piping bag – one fitted with the 2D tip and the other with the rose nozzle. Pipe swirls around the base of each tier and pipe roses on top.
Step 27
Colour any remaining white buttercream with lime green, place this in a small piping bag, snip the end into a V shape and pipe tiny green leaves in between the roses.
Step 28
Decorate the cake with the fox and mushroom biscuits.