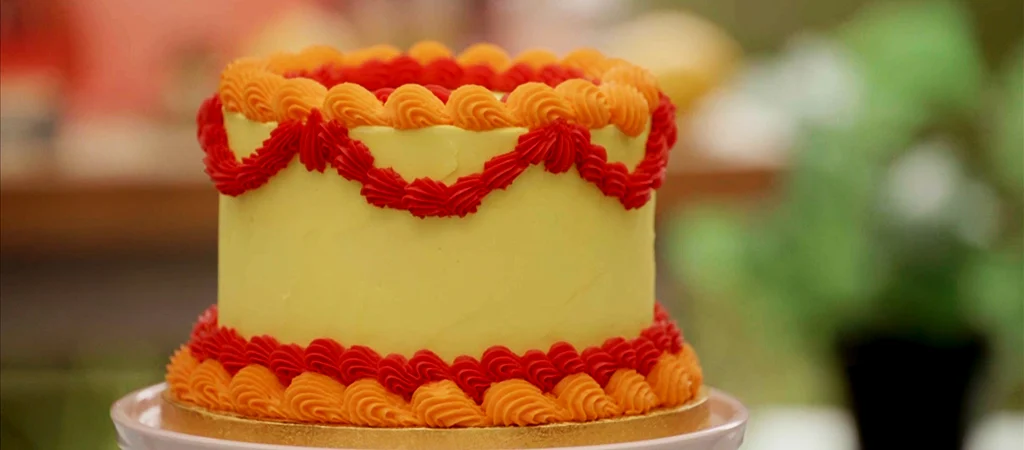
Caroline’s ornate vintage style cake is decorated with Lambeth style piping. Though it looks tricky, with a bit of piping practice you too can wow your friends or family with a stylish cake fit for any special occasion.
Makes:
1 cake
Difficulty:
Needs skill
Baking Time:
25 mins
- V
- Ingredients
- Method
Print recipe
Method
Step 1
Heat the oven to 190°C /170°C fan/375°F/Gas 5.
Step 2
Make the sponge. Cream together the butter and sugar, using an electric mixer until pale and fluffy.
Step 3
Once the butter and sugar is pale and fluffy, with the mixer still going, gradually pour in the beaten egg. Stop occasionally to scrape down the sides of the bowl, and if the mixture starts to split, add a spoonful of the flour. Add in the vanilla paste.
Step 4
Fold in the flour and baking powder until combined, and then add in the milk, mixing until just combined and the batter is smooth.
Step 5
Divide the mixture equally between the three prepared sandwich tins and spread level with a palette knife. Bake in the centre of the oven for 20 – 25 minutes, until risen and golden, and a skewer inserted into the centres comes out clean. Leave the sponges to cool in their tins for 5 minutes, then turn out onto a wire rack to cool completely. You can speed this up by placing them in the fridge or freezer.
Step 6
Make the lemon curd. While the sponges are baking, add the egg yolks, sugar, lemon juice and zest to a small saucepan. Set over a low heat and cook, stirring continuously with a wooden spoon for 7 – 10 minutes, until the mixture begins to thicken and coats the back of the spoon. Remove from the heat and stir in the butter.
Step 7
Pass the curd through a sieve into a wide, shallow container, then close-cover it with cling film and chill until set.
Step 8
Meanwhile, make the buttercream. Beat the room temperature butter until soft, using an electric mixer.
Step 9
Scrape down the sides of the bowl, then add ⅓ of the icing sugar. Restart the mixer on a slow speed and mix to combine, before adding some of the milk to loosen, and then beating on medium speed for 30 seconds.
Step 10
Repeat this process, scraping down the bowl between each addition, until all of the icing sugar has been added. Add the vanilla and enough milk to create a smooth and light, but pipeable buttercream, then beat on a high speed for 2-3 minutes. You may not need to add all the milk.
Step 11
Assemble the cake. Using a long, serrated knife, level the top of each sponge, if necessary, then place a cake board onto a turntable if you have one and apply a small dollop of buttercream to hold the sponge in place.
Step 12
Place the first sponge on the board and spread a layer of buttercream over the top, to the edge. Fill a medium piping bag with buttercream and snip off the end so that you have a 1cm diameter hole, and pipe a ring of buttercream around the outer edge. Spoon some of the chilled lemon curd into the middle, spreading it out evenly to fill the ring of buttercream, then place the second sponge on top and repeat the process with the buttercream and lemon curd. When placing the third sponge on top, turn it upside down, to ensure that your cake has a flat top.
Step 13
Using an offset palette knife, spread the top and sides of the cake with a thin, smooth layer of buttercream to create a crumb coat, and chill the cake until firm.
Step 14
Meanwhile, colour around two-thirds of the remaining buttercream yellow and set aside. Divide what you have left in half, and colour one half orange and the other half red. Add the orange buttercream to a piping bag fitted with a medium, 14 pronged open star tip, and add the red to a piping bag fitted with a smaller, open star tip.
Step 15
Take the chilled cake and place onto the turntable. Using an offset spatula, cover the top and sides of the cake with a smooth layer of yellow buttercream.
Step 16
Using the orange buttercream with the larger star tip, pipe a shell border around the top and bottom edges of the cake. To do this, hold the piping bag at a 45-degree angle, squeeze to build the shell, and then gently release pressure as you pull the tip away, creating a pointed end. Repeat to form a continuous pattern. You might want to practice this on some parchment paper first.
Step 17
Using the red buttercream with the smaller star tip, pipe a ring of smaller shells on the top of the cake, around the inside of the orange border, and repeat around the bottom of the cake, just on top of the bottom orange shell border.
Step 18
At 6 equal intervals around the cake, just below the top orange border, pipe a single vertical shell of red buttercream. Then pipe a semicircle chain of small shells between each of these to join them, looping down and up again between each one to complete the decoration.