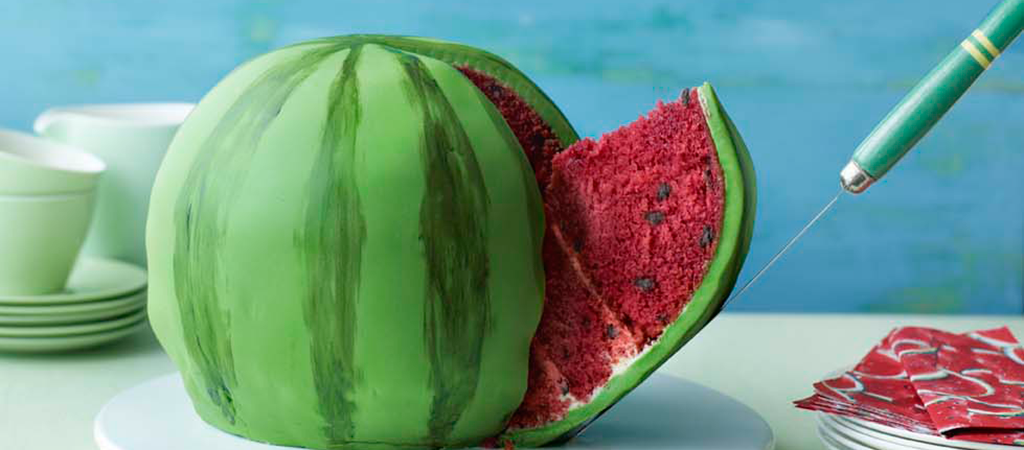
A real ‘wow’ of a cake, this beauty is four layers of sponge, coloured and flavoured to look and taste just like a watermelon, complete with chocolate chip ‘seeds’ and a green fondant ‘rind’.

Flo
Series 8
- Ingredients
- Method
Method
Step 1
Heat the oven to 180°C/160°C fan/350°F/Gas 4. Beat the margarine and sugar in a mixer until light and creamy. Gradually beat in the eggs, adding a tablespoon of the flour with each of the last 4 pours of egg. Fold in the rest of the flour with a large metal spoon, followed by two thirds of the chocolate chips.
Step 2
Mix about half the red food colouring with 2 tablespoons of the syrup, then stir in a few tablespoons of the sponge batter. Add this to the rest of the batter and combine until there are no streaks.
Step 3
Transfer equal amounts of the mixture into the 3 prepared tins and the hemisphere mould (place the mould on a baking sheet). Bake until a skewer inserted into the centre comes out clean, about 30–35 minutes for the sandwich sponges; 55–70 minutes for the hemisphere sponge. Remove from the oven and loosen the edges. Turn out the sponges to cool on a wire rack for 5 minutes; leave the hemisphere sponge to cool in its tin, then turn out.
Step 4
Make the white buttercream. Beat the butter in a bowl until creamy, then gradually beat in the icing sugar, then the syrup. Cover and set aside. Repeat for the red buttercream, adding about one eighth of a teaspoon of red colouring. Cover and set aside.
Step 5
Brush the undersides of the warm sandwich sponges with watermelon syrup, then cool completely. Place 1 sponge, top-side down, on a cake board. Spread with one third of the red buttercream and sprinkle over one third of the remaining chocolate chips. Place the second sponge on top, top-side down, and repeat. Add the third sponge and repeat again. Set the hemisphere sponge on top and gently press down so the cake holds together. Chill for 20 minutes to firm up.
Step 6
Using a bread knife, carve the bottom 2 sponge layers into the curve of a watermelon. Spread half the white buttercream over the whole cake. Chill for 15 minutes, then spread over the remaining buttercream to make a smooth and even top layer. Chill until very firm.
Step 7
Make the fondant. Put 30ml of water into a heatproof bowl and sprinkle over the gelatine. Leave to soak for 5 minutes, or until the mixture looks spongy, then set the bowl onto a pan of very hot water and leave for a few minutes, until the gelatine is smooth. Remove the bowl before the mixture gets hot, and stir in the glycerine and glucose.
Step 8
Sift the icing sugar into a large bowl and make a well in the centre. Pour the gelatine mixture into the well and start to mix in the icing sugar. As soon as the mixture feels less ‘damp’, turn it out onto a worktop liberally dusted with icing sugar.
Step 9
Gradually knead in enough of the remaining icing sugar to make a firm but easy-to-roll fondant icing (you may not need all the icing sugar). Using the tip of a small knife dot the food colouring on the icing and knead it in thoroughly to create an even colour. Add more colouring, little by little, kneading well between each addition, until you reach watermelon green.
Step 10
Roll out the fondant icing on a worktop dusted with icing sugar into a large disc to cover your cake. Drape the icing over the cake, then press and smooth out any pleats. Tuck the icing under the cake, then trim the excess. Use the tip of a knife to press the icing under the sponge to cover any gaps.
Step 11
Mix a little dark-green food colouring with water and paint darker green stripes down the sides of the ‘watermelon’. Allow to firm up for 4–5 hours before cutting.


